Steel Grill Gazebo Installation Instructions
CAUTIONS:
1. When installing and assembling your gazebo, it is recommended that two or more adults are involved.
2. Do not use the gazebo during an electrical storm, as there is a remote chance of getting struck by lightning.
3. Do not climb on top of the gazebo. Falling off the gazebo can result in serious injury, possible even death.
4. Don not leave the gazebo assembled when there is a risk of high wind, as possible damage will occur to the structure.
5. Do not use lanterns that contain open flames.
6. This package contains small items and plastic bags that should be kept away from children.
7. Ensure that all connectors & poles are firmly secured in position fully. It is important to do so before use so as to avoid collapsing or damage to the item, which could result in injury.
8. KEEP ALL FLAME AWAY FROM THIS SHELTER FABRIC. The fabric may burn if it is exposed to prolonged contact with a flame source. The application of any foreign substance to the fabric may render the flame-resistant properties ineffective.
USE&CARE:
1. This gazebo is not a permanent structure and should be disassembled & stored away after use.
2. Do not repack your gazebo until completely dry.
3. This gazebo must not be left erect in windy conditions.
4. Steel components for garden accessories and furniture are treated with rust inhibiting paint that protects them from rust. However, due to the nature of steel, surface oxidation (rusting) will occur if this protective coating is scratched. This is a natural process. To minimize this condition, it is recommended that care be taken when assembling and andling the product in order to prevent the paint from being scratched. Surface rust can be removed easily using a very light application of common cooking oil. If surface oxidation (rusting) occurs and no measures are taken to correct it, the oxidation may start dripping onto the deck or patio, which may cause damaging stains that may be difficult to remove.
Left Upper Post
A1

2
Right Upper Post
A2

2
Lower Post
A3

3
Lower Post with Opener Hole
A4

1
Upper Big Beam
B1

4
Lower Big Beam
B2

2
Lower Big Beam with LED Light Hole
B3

2
Big Connector
C

1
Small Beam
D
4
Long Screen with Connector
E1
2
Long Screen Short Part
E2
2
Short Screen
F

2
Steel Grid Panel
G1

1
Steel Grid Panel with Hole
G2
1
Hook Rack
H

1
Panel Connector
I

4
Small Canopy
J

1
Big Canopy
K

1
Hook
L

1
U Shape Part For Upper Post
M

4
Stake Cover
N

4
Piece for Stakes
0

4
Bottle Opener
P

1
LED Lights
Q

2
Bolt(M6*15)
AA

52
Gasket
BB

60
Bolt (M6*35)
CC

4
Hexagon Nut
DD

4
Wrench
EE

1
Stake
FF

8
Cross large flat head bolt (M6*15)
GG

2
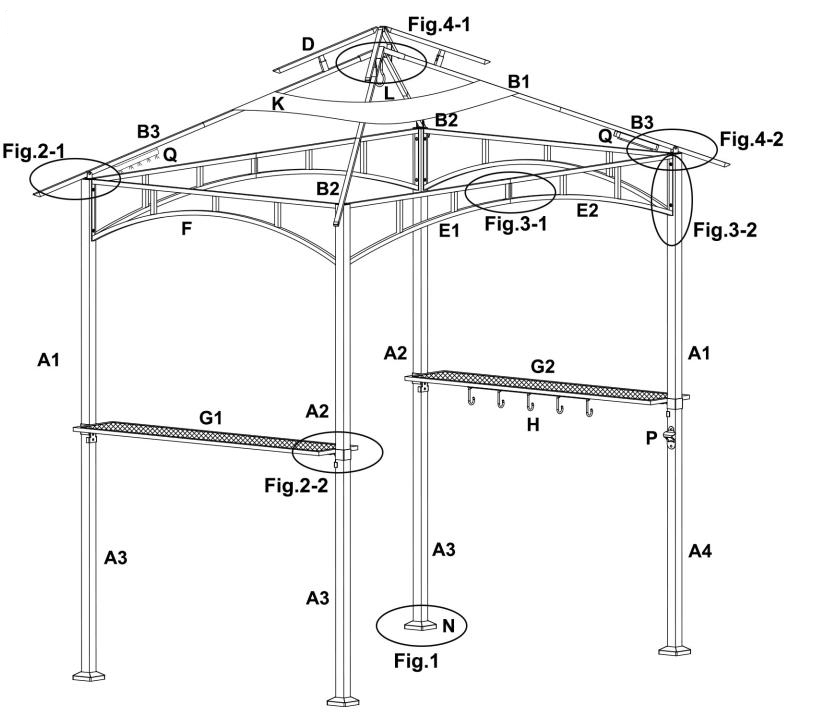
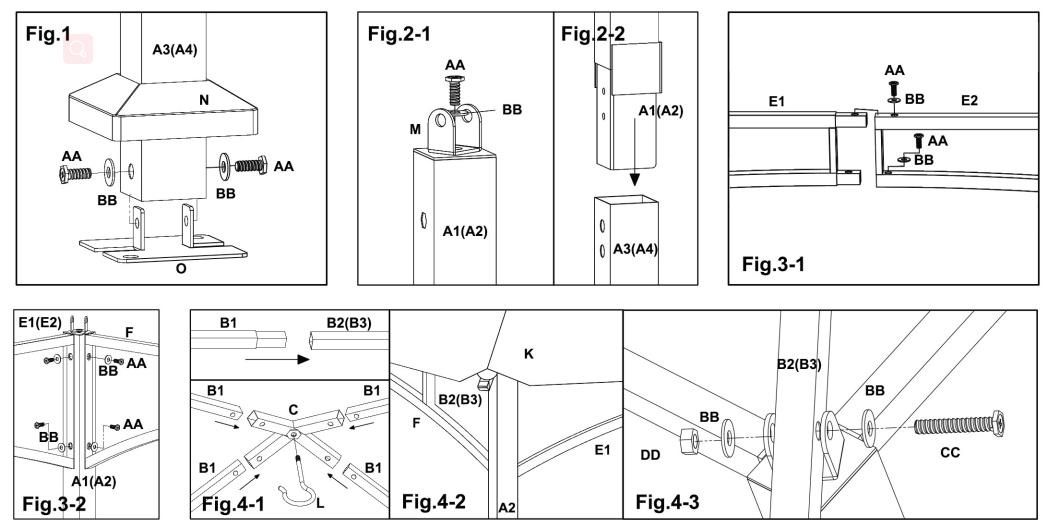
Fig 1: Let Stake Cover (N) go through pole (A3, A4). Then attach Lower Post (A3, A4) to Piece for stakes (O) with screws. Fig 2: Attach the U shape part (M) to Upper Post (A 1, A2) with screws. Then attach (A1, A2) with (A3, A4). Attention, check the screw hole on the Post (A 1, A2, A3, A4) must face to another Post (A 1, A2, A3, A4) on 5Ft side.
Fig 3: Attach the long screen with connector (E1) to long screen short part (E2) with the Bolt (AA) and Gasket (BB). Then attach the Long Screen (E1, E2) and the Short Screen (F) to the Post (A1, A2, A3, A4) with the Bolt (AA) and Gasket (BB).
Fig 4: Attach the Upper Big Beam (B1) to the Big Connector(C), fix Hook (L) to Big Connector (C). Then, attach (B1) to Lower Big Beam(B2, B3). Extend the Big Canopy (K) onto the big top. Remember do not fix the four corners. Insert the Lower Big Beam (B2, B3) into the U shape part (M) of Post (A1, A2, A3, A4), then use bolt (CC), Gasket (BB) and Hexagon Nut (DD) to keep Upper Big Beam (B1) stable on the Post (A1, A2, A3, A4).
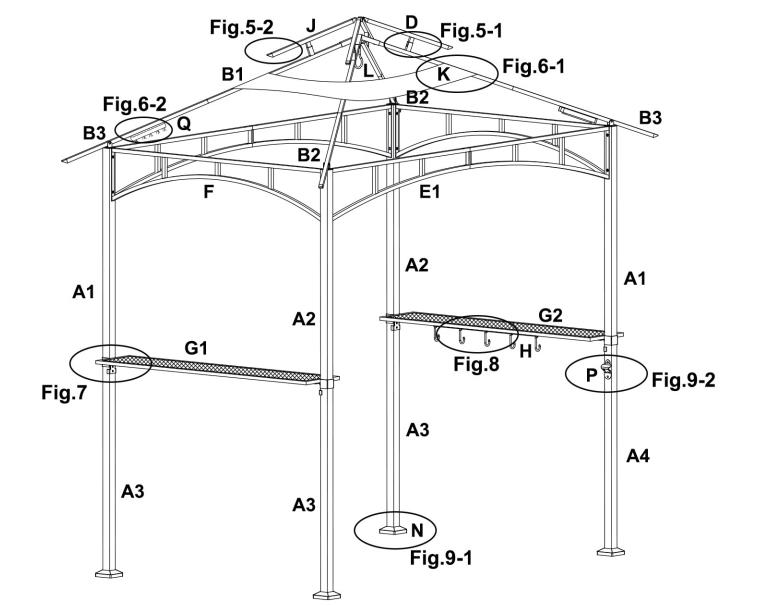
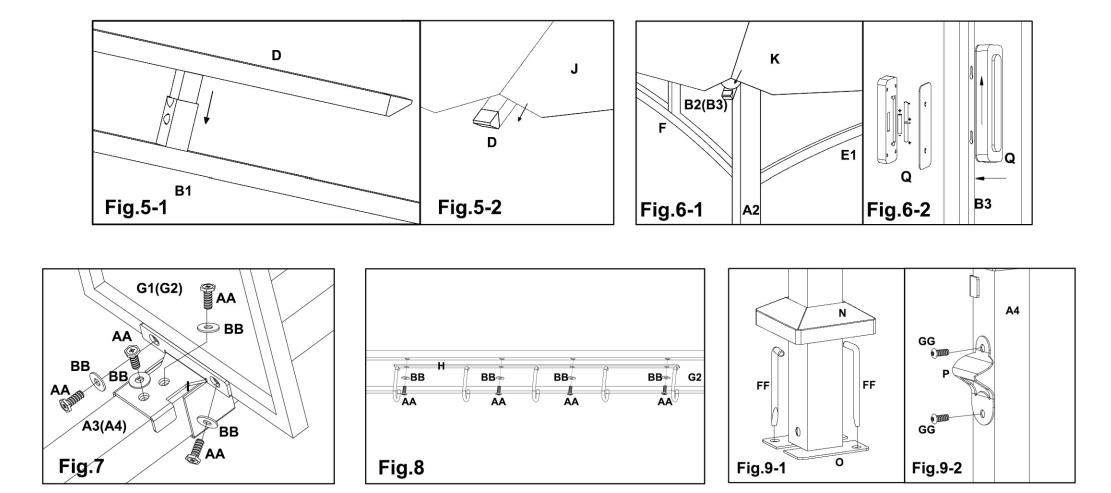
Fig 5: Insert the bottom connector of the Small Beam (D) to the upper pole of the Big Beam(B1). Extend the Small Canopy (J) onto the small top by fixing the canopy at four corners of top.
Fig.6: Fix the canopy at four corners of top. Attach the LED Lights (Q) on Lower Big Beam to
LED Light Hole (B3).
Fig.7: Attach the panel connector (I) with the Post (A1, A2, A3, A4). Then attach the
Hook Rack (H) to the Steel Grid Panel (G1, G2) with the Bolt(AA).
Fig.8: Insert the Steel Grid Panel (G1, G2) into the Post (A1, A2, A3, A4), then
attach them tightly with the Bolt (AA).
Fig.9: Fix the gazebo to the lawn by using the stakes.
Attach the Bottle Opener (P) on the Lowest Post with Opener Hole (A4)
with Cross Large Flat Head Bolt (GG).